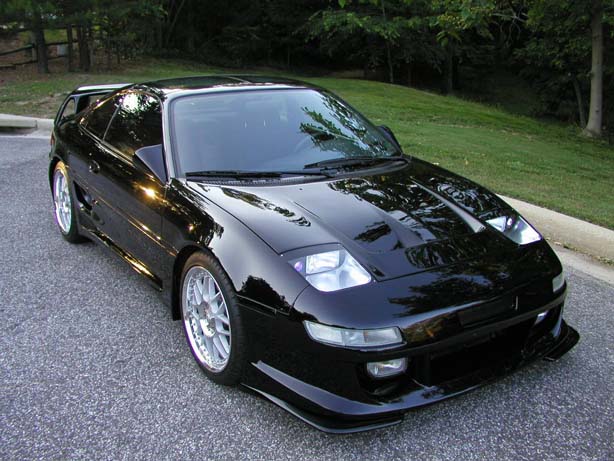
The Beast
Flush-Mount Headlights
Update 03-18-04 See Below
____________________________________________________________________
Prolog: 27 October 2002
Flush mounted lights are really cool. I love the way they look. They bring
back the classic style of the old Ferrari race cars. They are also more
aerodynamic than the pop up's.
I get hundreds of e-mails from guys begging me to make them a set or
asking for help in making their own. I have tried to put a lot of
information on the Beast site to help those who want to give it a try. The
problem is that most people don't have the shop skills or proper tools to
fabricate something that will work.
On the surface the lights look simple. The reality is that they are far
more complex.
I don't recommend doing the metal bases if you are good with fiberglass. The bases
that were used were custom
built using ideas from a number of previous projects and ideas picked up
from looking at different bases including Street weapon's design.
Although this set uses some of the features seen in other lights, they were
custom built by laying up fiberglass over polyurethane forms. The poly
urethane was then carved out, leaving the fiberglass bases. The bases were then
modified to accept the H4701 GE bulb and the small projector light at the
outside corners. I would estimate that I have $2400 in the current set.
Problem areas are this:
a. sealing the lights from moisture
b. finding a solution to having both bright and dim in a small bulb.
c. building the lights to a quality standard that will match the rest of
the car.
d. dealing with heat buildup inside the light housing
e. Making the compound curved lenses correctly
I have made a number of the lenses both from Polycarbonate and Lexan. I am
finding the Poly lenses easier to mold. The Lexan supplier will only sell
me 4' x 8' sheets. It's very expensive. It takes a special band saw and
blade to cut it or the edges melt.
I mold them in my oven at 215 degrees for about 15 min. One out of
three lenses will mold correctly. I usually manage to make enough to break even
when I sell a set for $150.
Now the bottom line. Most guys don't want to go through all of that. It's
a lot of work, trouble and money to end up disappointed with the end
result. As I have said before, the Beast is mainly a fair weather car and
practical lights are not as much of a requirement as your daily driver.
I hope this helps clear up a lot of the questions that you guys have.
___________________________________
Now back to the original text.
Consider the data below as historical information on the development of the
Flush Mounted light project. I have included it to assist you in
building the original aluminum based lights.
______________________________________________________________________________________________________________
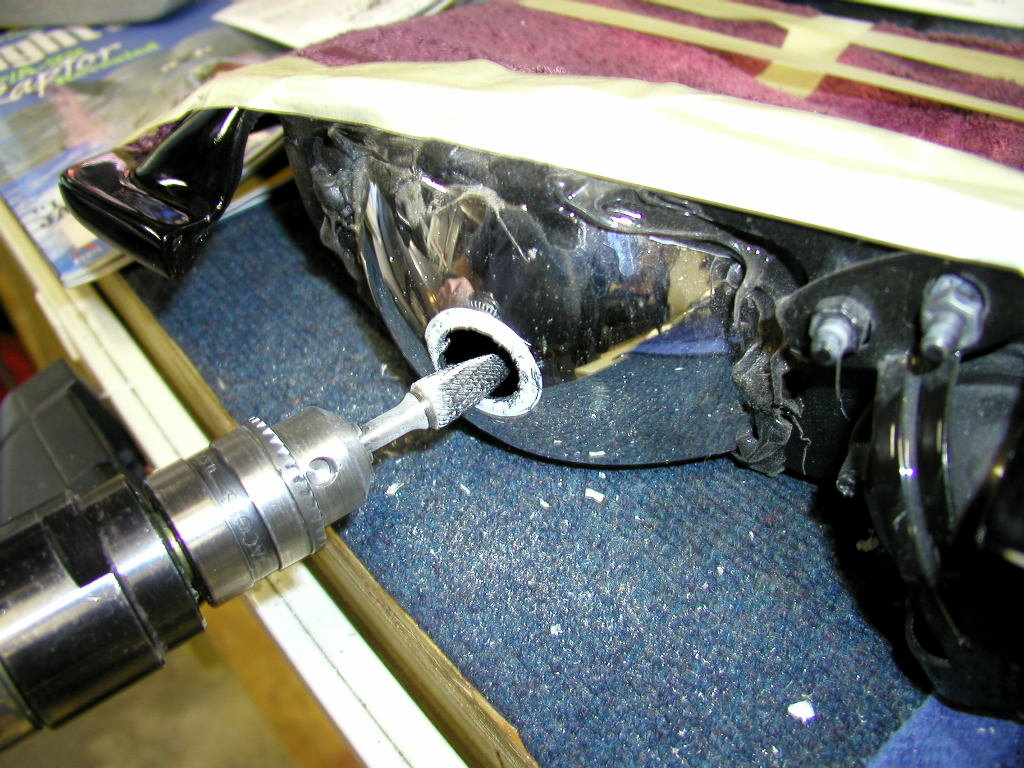
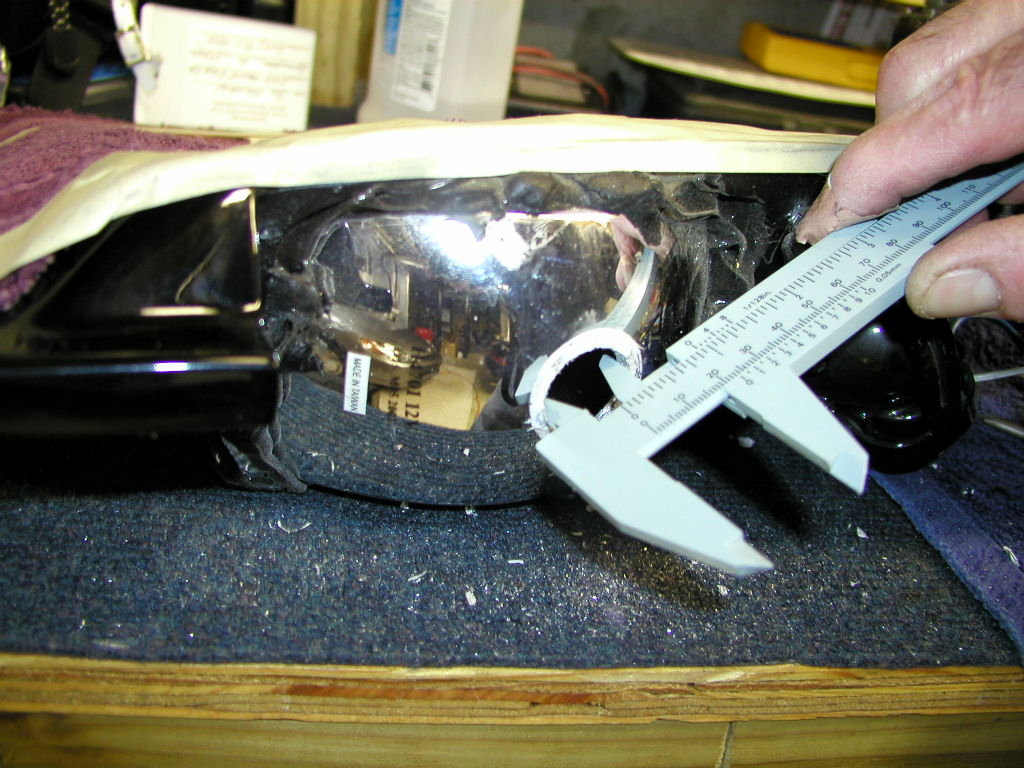
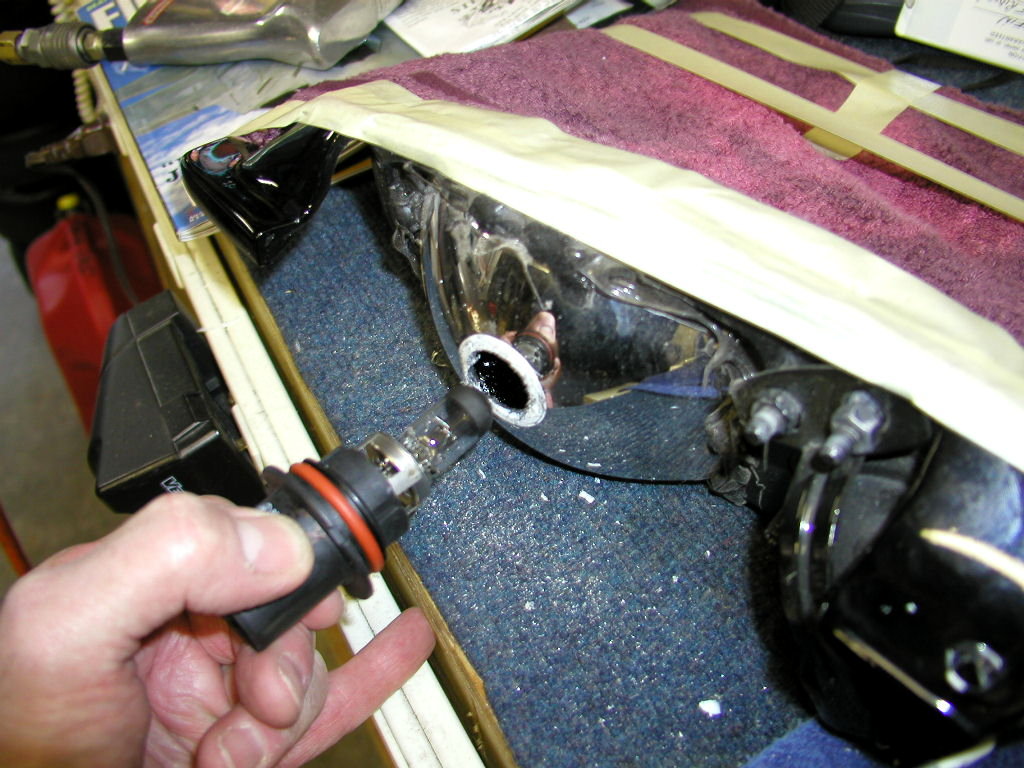
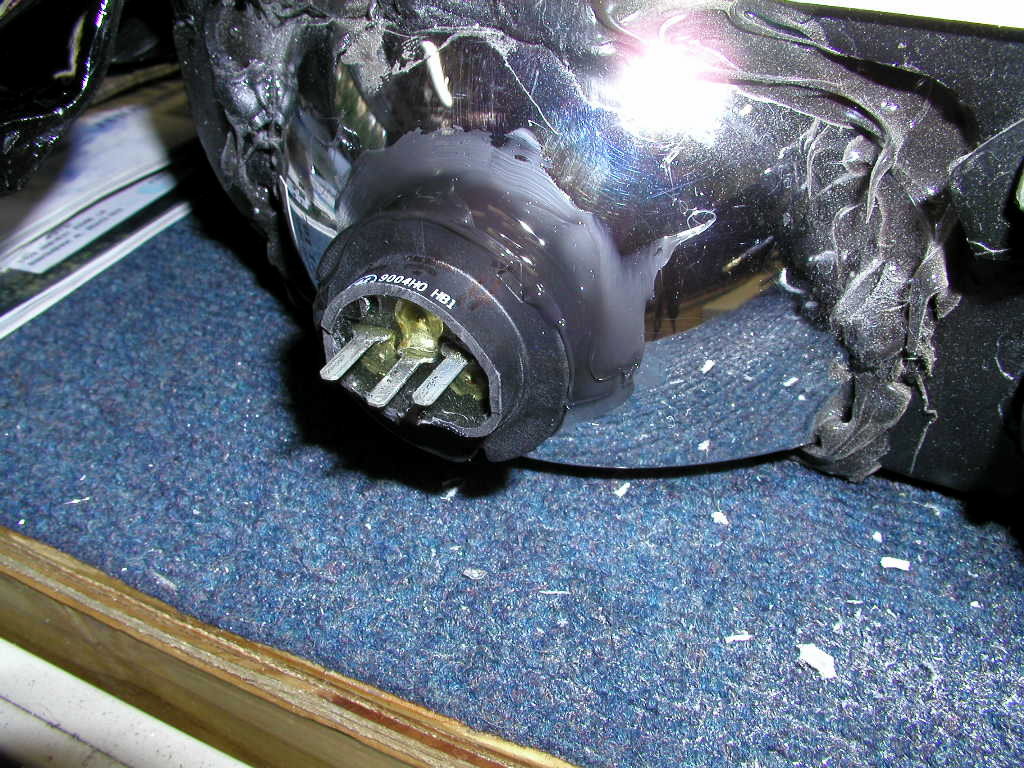
Update March 18,
2004. After using the flush mounted lights for two years I have
finally made the change to bulbs which have both "bright" and "dim"
filaments in the same bulb. As you may recall, the original 4701
light bulbs were a high beam only unit. They were selected because
they were the only US DOT approved bulbs that would fit in the fiberglass
housing. They are 3" x 5.5" not including the border.
The solution was to carefully remove the old filaments and replace
them with dual filament, replaceable, bulbs made for other types of
headlights.
I found the bulbs at Walmart @ $18 for a pack for two.
They are GE 9004HO High Output Xenon with an average life of 700
hours. I cut off about 75% of the rear skirt on each bulb so they
would not stick out so far in the rear. The white soft protectors on
the old 4701 bulbs were removed, and that exposed a small Phillips screw.
Once that was removed the filament could be taken out leaving a square
hole. I used a carbide bit in a die grinder to open up the hole to 1 and
1/8th inch so that the new dual filament bulb would slide inside the old
glass. Black silicone calk sealed it up. New three prong,
female connectors were bought at NAPA auto parts, part number LS6493.
It says NAPA ECHLIN on the box. These were soldered to the three light
wires, High beam is Red/yellow, Low beam is Red/blue and the center
hot wire is Red/ green for the left light and Red/black for the right
light.
Understand, that the Toyota bright/dim switch is simply switching the
ground between the two filaments in the bulb, ie wires (Red/yellow and
Red/blue) to dim the lights.
___________________________________________________________________________________________________________________
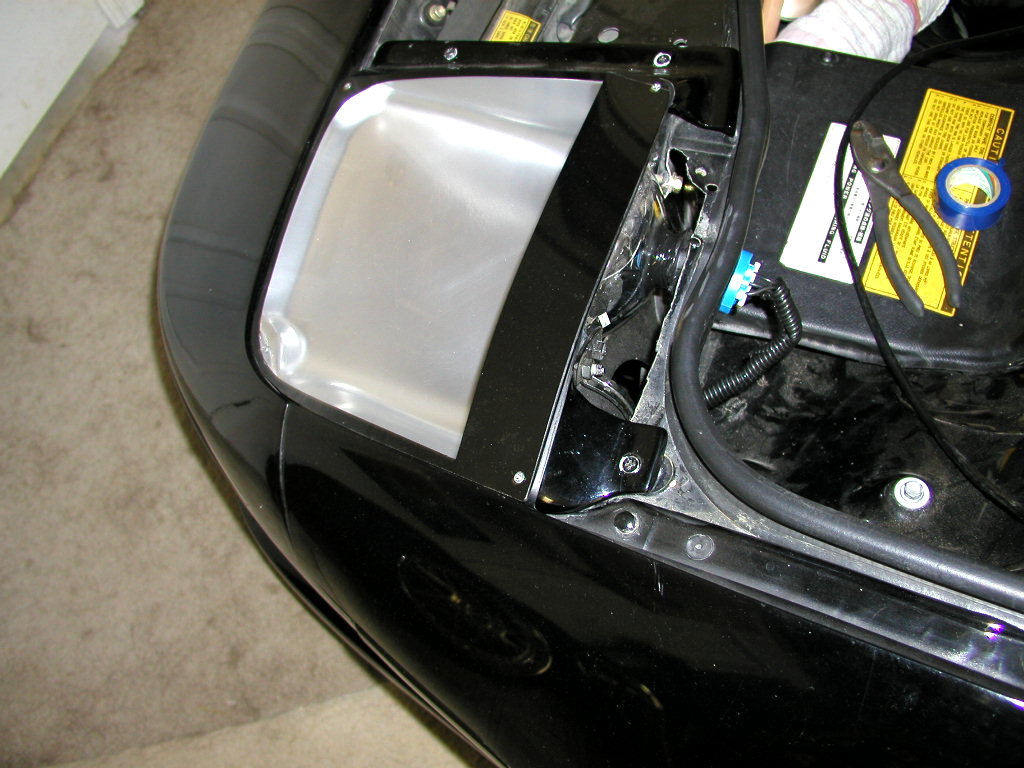
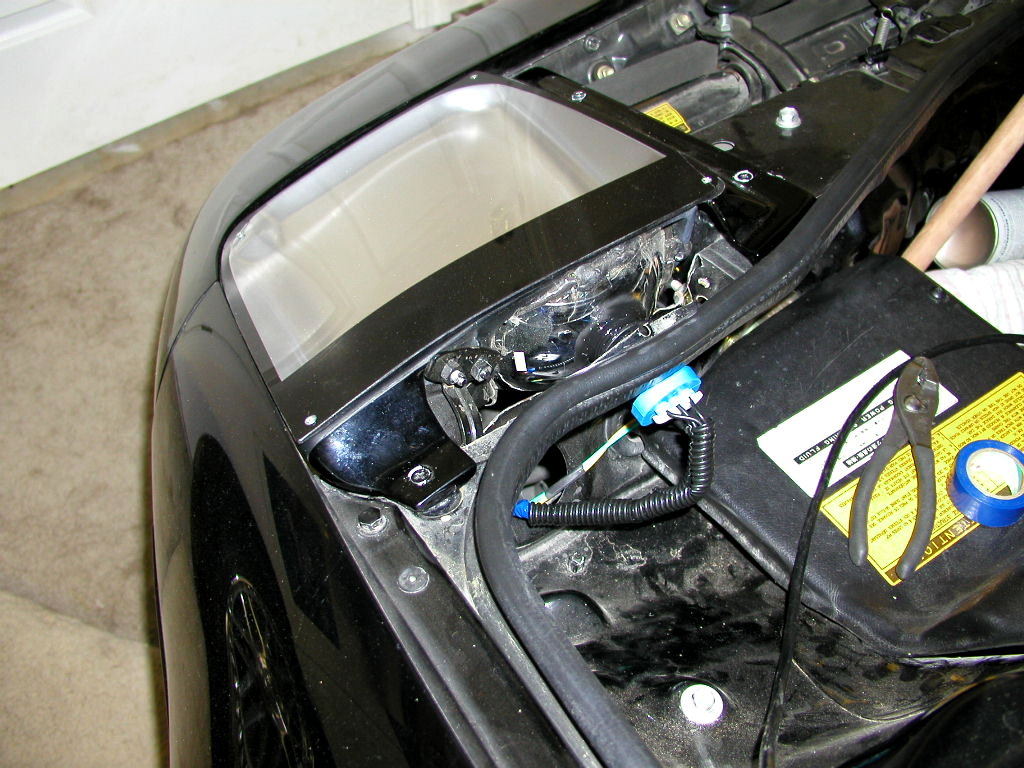
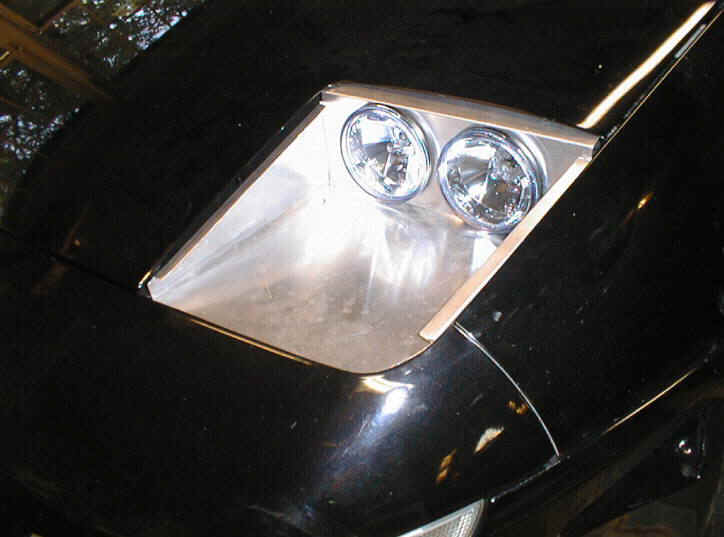
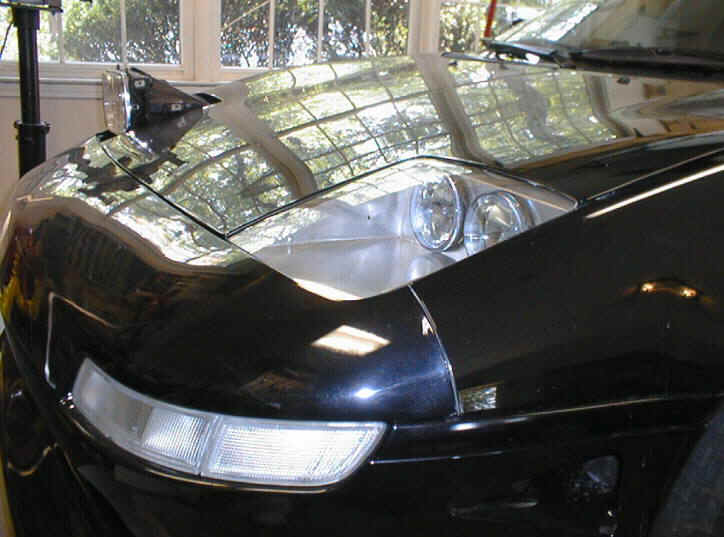
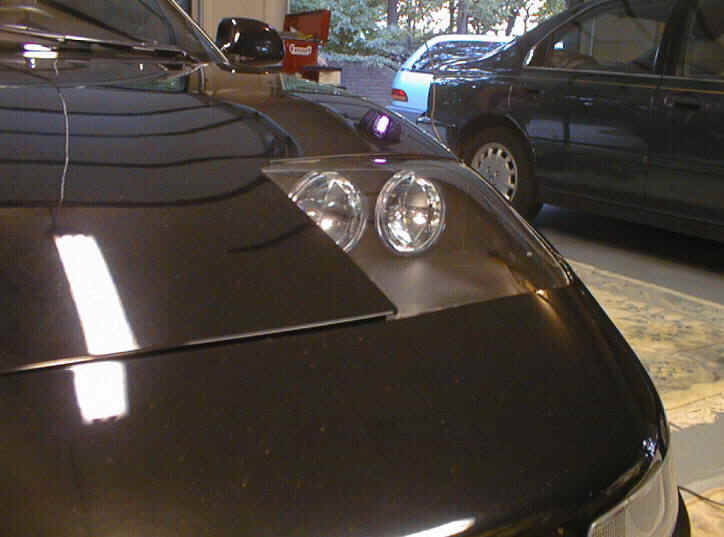
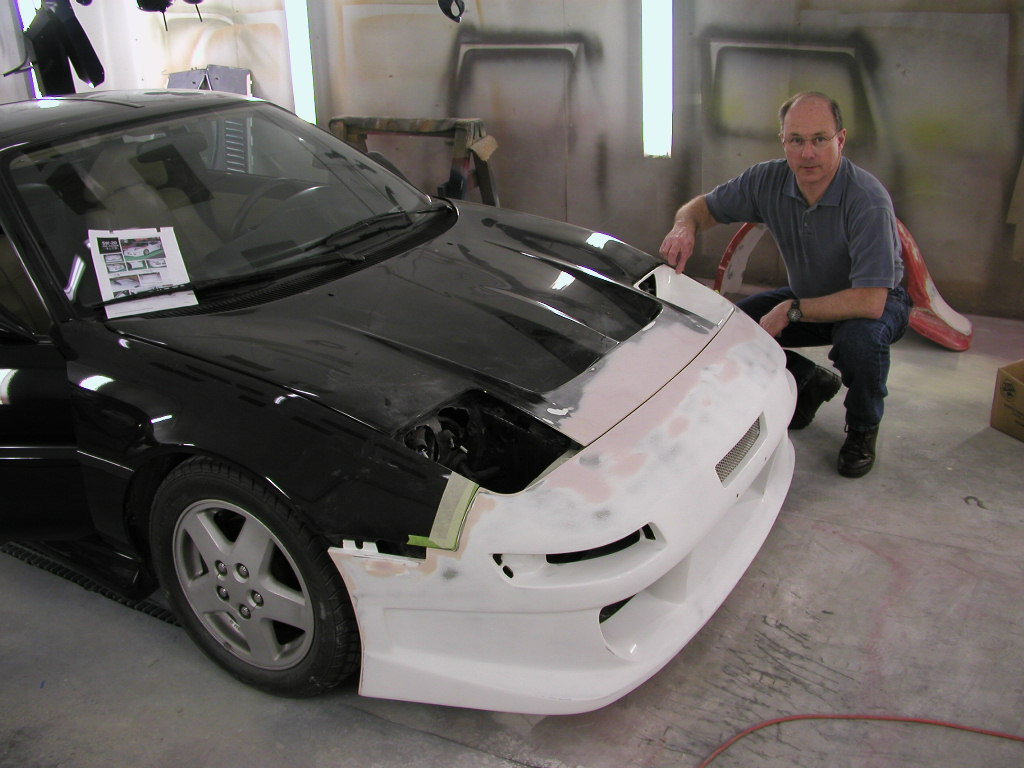
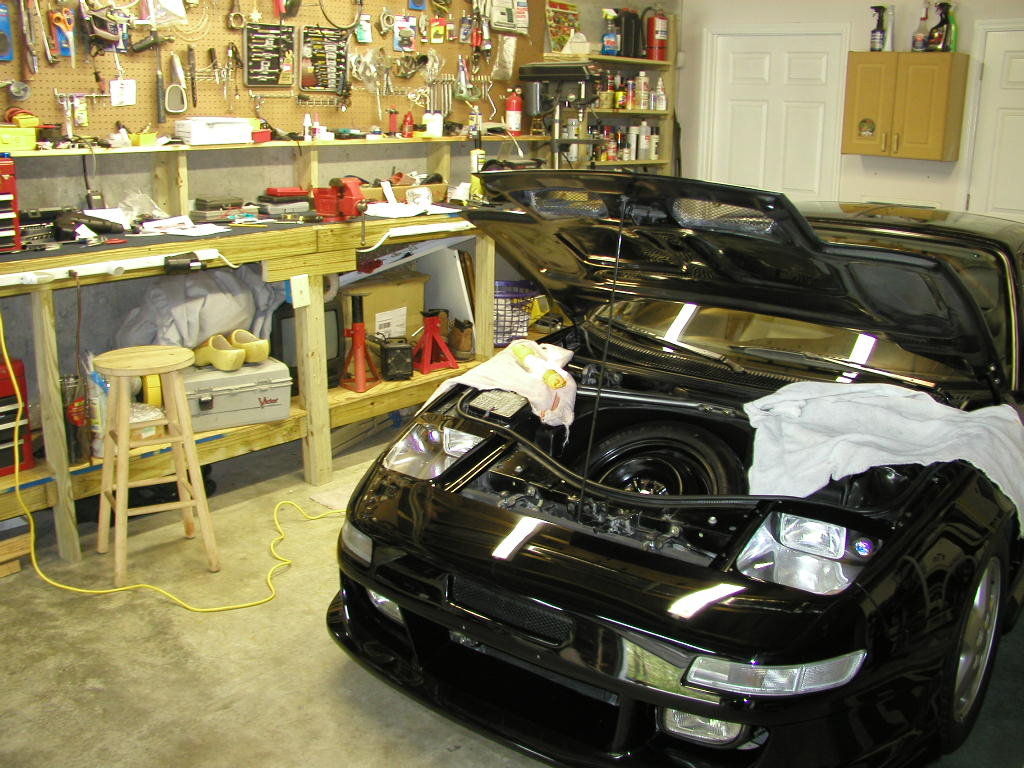
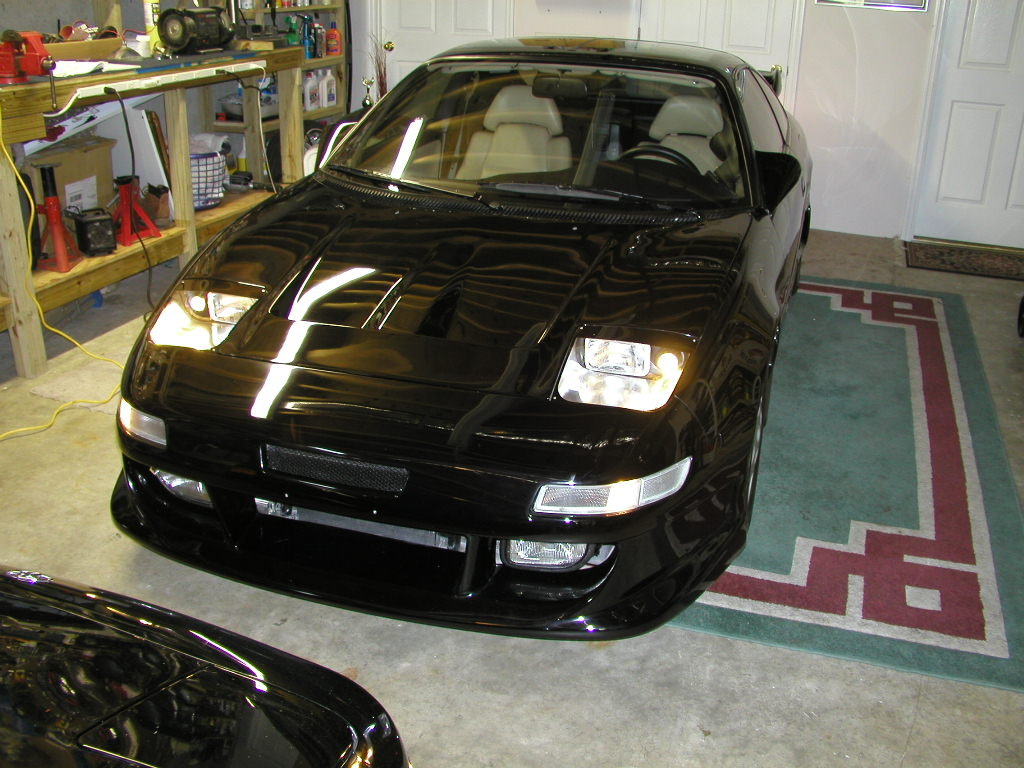
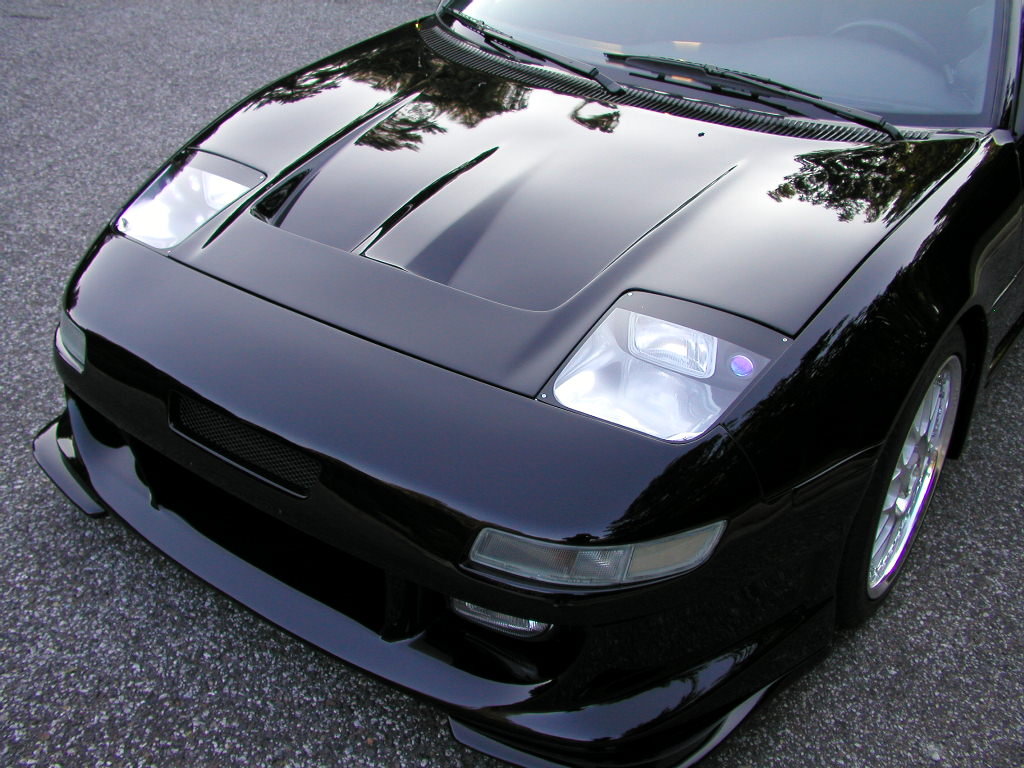
Update: March 8, 2002. Big changes have been made to the flush mounted lights on the Beast. Recent changes in the front bumper and Border hood have required that I redesign the lights. I decided to build a custom fiberglass base for the lights that uses the Philips H4701 sealed beam and a single projector light. The sealed beam is one of the smallest US spec sealed beam available. The base was built so that the sealed beams install from the front. The new lights produce much better light than the older round units seen in the photos below.
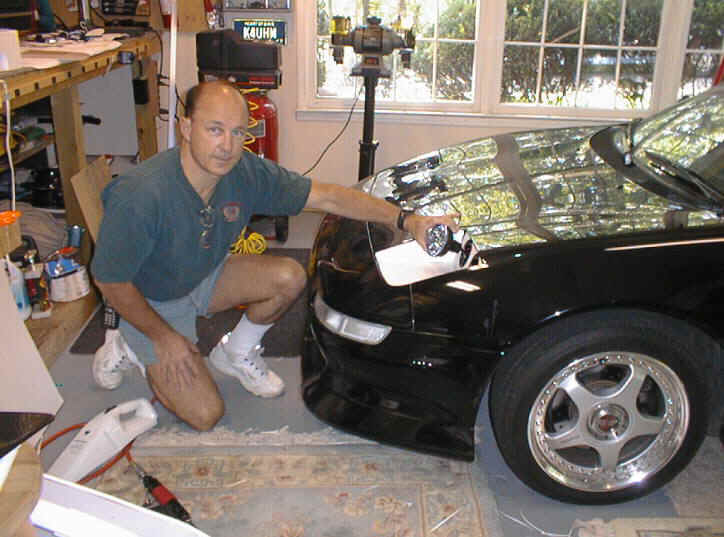
My thanks to Dennis Lyons of Impatient Creations restoration shop in
Birmingham, AL for their assistance and help in the joint project to
develop the new lights.
Now, back to the story.
MR2 owners have long admired the aerodynamic look of flush mounted
lights on the Ferrari F-40 and other exotics. Their smooth, low drag
design would be a functional addition to the second generation MR2. Many
Mk 2 owners have dreamed of adapting similar lights to their own machine.
The few Mk2's that are seen in magazines sporting the flush mounted lights
are usually "one off" designs created by their owners. The
addition of FMHL to the Beast has been an idea that finally worked its
way into reality. " The first time I saw a MK2 I thought how cool
they would look on the car. Toyota missed an opportunity by not designing
it that way". The new lights are lighter, simpler, have less drag,
work as well or better as stock, allow you a choice of individual light
units, and generally look better than the old pop up lights.
____________________________
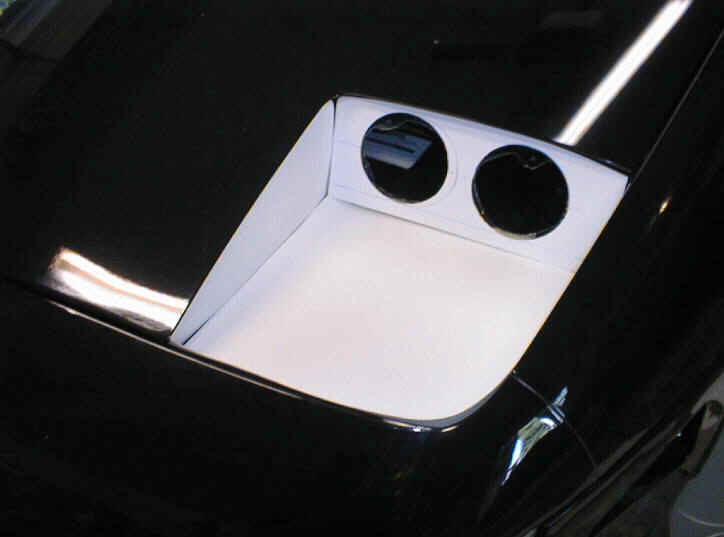
The Aluminum Base Lights
Information on the original aluminum light set. This
information is you those of you who want to build the original design,
aluminum base lights.
The prototype set was made by making an aluminum box traced from a
pattern, cutting several 4" holes in the rear of the old head light
area, wiring up the lights and installing the pre formed Lexan clear
covers. A "Beta Test" version has already been sent to someone
on the IMOC list who will build it and assist in working out the bugs in
the system. One of the most difficult parts is bending the aluminum boxes.
It can be done with a regular metal brake (bender) but a box brake with
removable sections works much better. The other difficult part is forming
the clear Lexan covers. They have to be done carefully in order to keep
the optical clarity and proper shape. "Having good shop skills, a
place to work and better than average tools is a must before someone
begins this project," says Jim. "This is not a Saturday
afternoon, shade tree job. If your car is your daily driver, you need to
build the boxes first, have all the parts and tools ready, and do one
light at a time. Taking your time and doing good work is
important."
Finding someone with a Box Break metal bender will speed things up and
make a nice job of bending the aluminum. Without it, you will make a
mess. It does require removing some metal behind the old lights that
you remove. I left enough behind so that I could replace my original
lights in the future if I changed my mind.
The actual bulbs can be any 4" round lights you can find. Mine
are halogen, "Blazer" lights from Walmart. They work fine,
but I plan to replace them with stronger HID units in the future.
Condensation: Depending on where you live, you might have some
condensation problems inside the lenses. I drive mine here in the
South and see very little of it. I bought two tiny 12v computer fans
from Radio Shack and plan to install one on the bottom side of the base on
each unit, to pull air through the enclosure.
The stock bright dim switch is used to switch the ground between relays
that cut the power to the outside lights on dim. The inside lights
have more down angle than the outside lights for dim. The lights are
sealed in place with silicone calk that remains somewhat flexible and
allows a cable tie to be used to adjust the up or down angle. This
system of adjustment was simple and worked well.
__________________________________________
How to make the lenses
Remove the old headlight tops to use as a mold. I bought white felt at a fabric shop and stretched it across the tops of the old headlight covers to keep the Polycarbonate or Lexan from sticking. My latest lights use Polycarbonate lenses in 3/16th thickness. I found them easier and cheaper to mold. So far they have held up very well.
I had to use thin wire under the back side to hold the fabric tight (like lacing it up). I set the oven at about 215 degrees F and let it warm up. Cut the lenses to correct size and shape (use a poster paper pattern) and put it on top of the cover. If you watch the plastic through the oven door, you can see them begin to sag down on the top of the felt. When they sag a lot, pull them out and press down on top of the Polycarbonate or Lexan with towels to finish forming them to the proper shape. Let it cool. You might have to do several to get it right. Good luck!
_______________________________________________
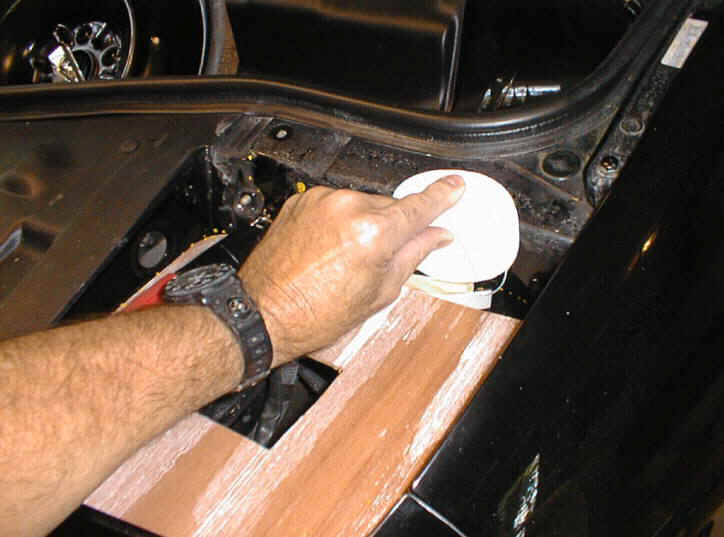
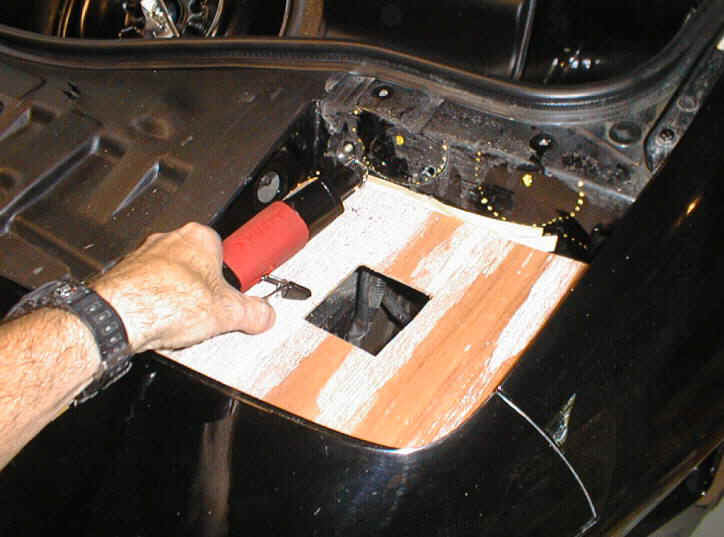
Photos of the building Process
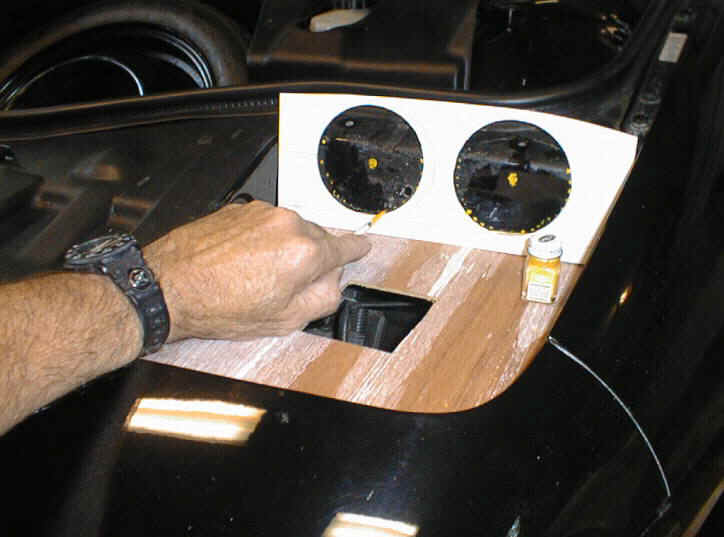
Marking holes for lights. Metal must be removed from rear of
headlight area to allow lights to fit.
Wooden base support used in positioning aluminum bases during
fitting process. Hand operated, air saw (Sears or Lowe's hardware) is used
to remove metal.
Trial fitting lights with poster paper patterns
Fitting individual lights. Lights are held in place using
black silicone calk around the back side of the enclosure.
Light boxes are made of 40 thousandths aluminum and secured to the
inside of the car with metal screws
Color test in Black was rejected in favor of silver
Painted borders (inside surface) of Lexan lens.
The finished product
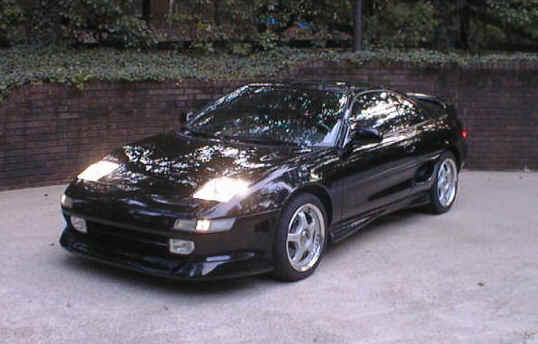
Feb, 2002 update: The original round flush lights were removed
and sold. The new set seen
in the top photo were a joint project between Impatient Creations body
restoration shop and myself.
____________________________________
The Fiberglass Base Lights
History: The aluminum lights were adequate but
were not as bright as needed. The bases were made from hand forming
aluminum sheet in a metal brake. This was not an exact science and
although the lights looked good, they lacked the quality of the rest of
the car.
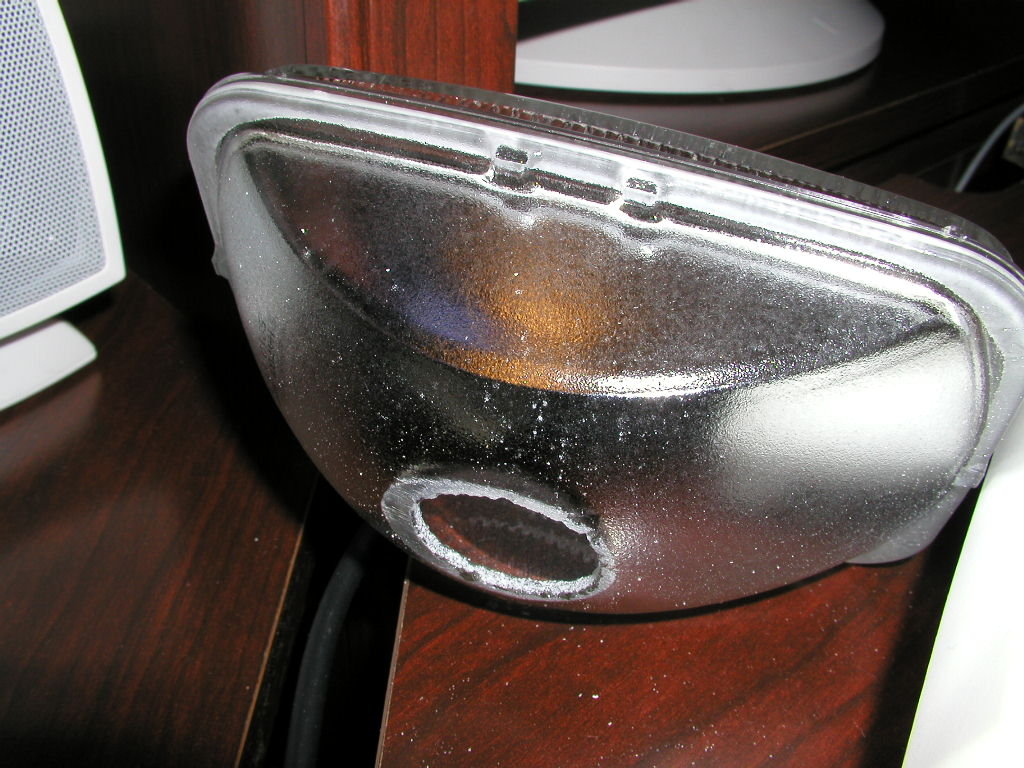
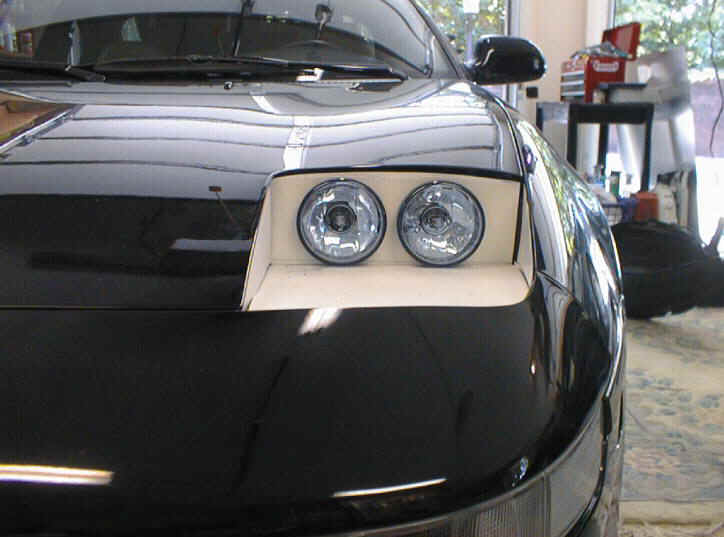
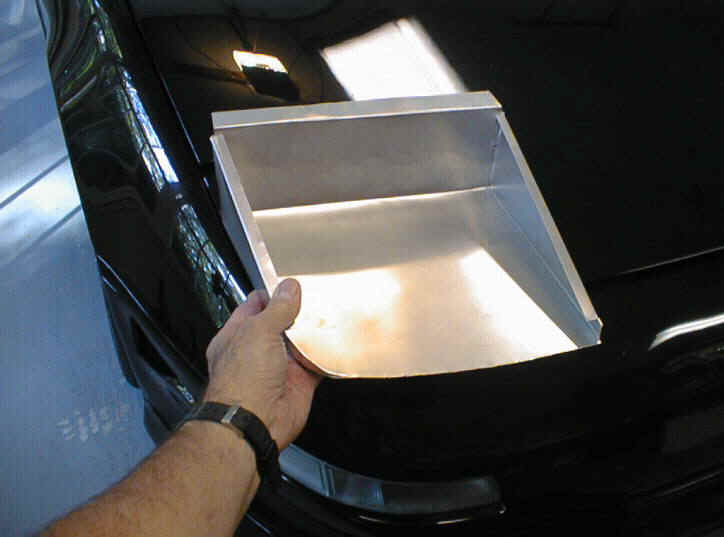
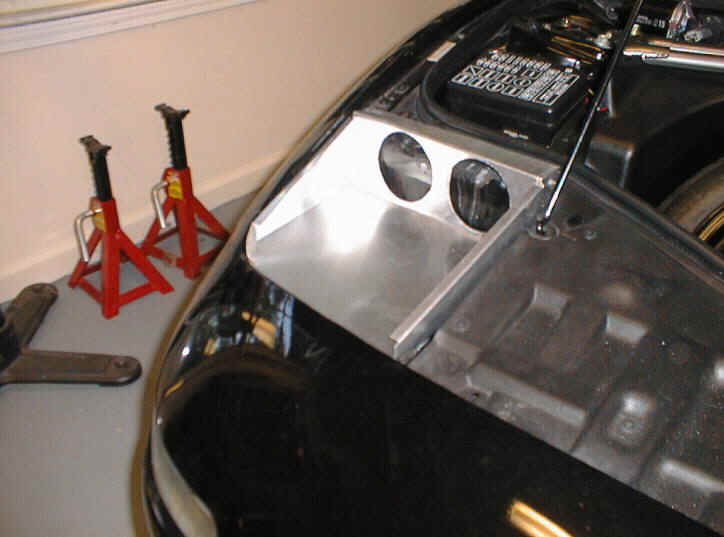
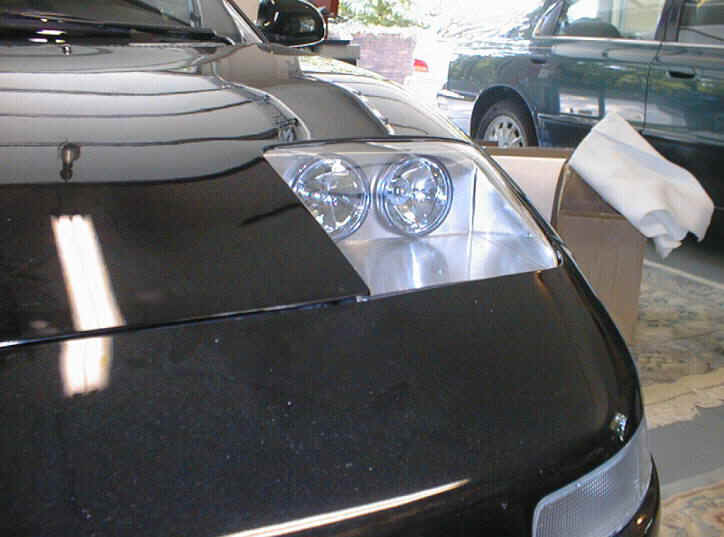
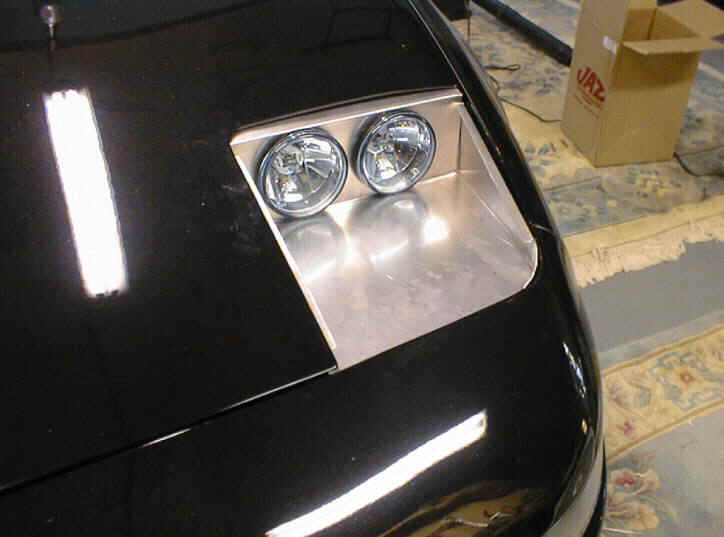
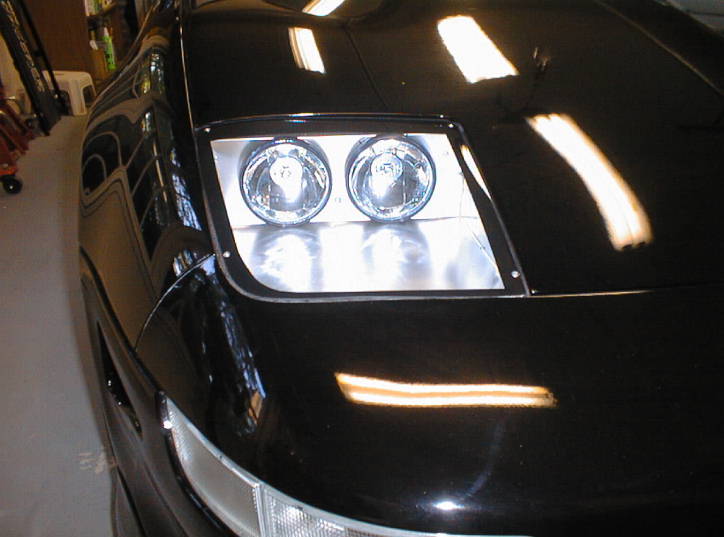
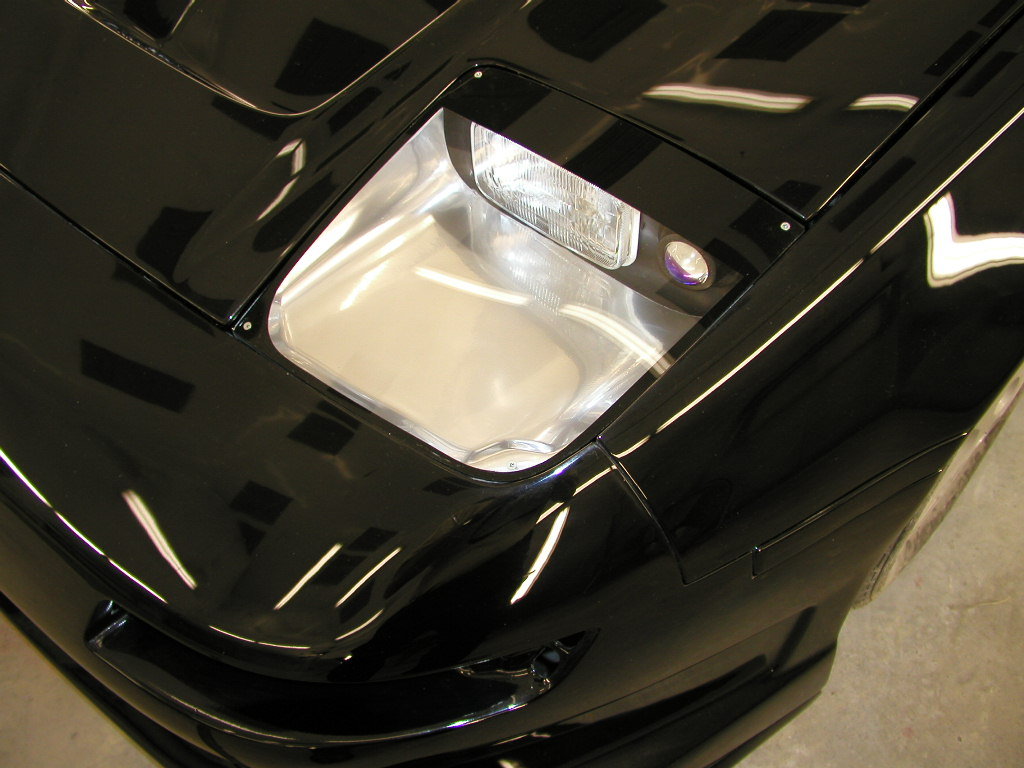
A decision was made to look for a better design. There were several fiberglass designs on the market in Japan and one here in the US. After looking at the options it was decided to take the best features of the three sets and combine them into a single unit that would hold a US DOT approved sealed beam bulb. The GE H4701 bulb was selected along with a small projector lamp. Both bulbs can be found at Autozone and are inexpensive. The H4701 is a high beam unit used on 1988-89 GMC trucks and some cars. It was paired with the H4703 low beam to make up the set in the truck. The projector lamp is a 55 watt light sold for under $45 a set.
Polyurethane foam blocks were bought at an AC shop and carved into the shape needed to fit the openings. The mounting system used on the Street weapon lights were found to be the best and this design was used on the new set. Fiberglass was laid up over the forms and coated with resin. After hardening, the poly urethane forms were removed and the new bases, trimmed and primed. Further modifications were made to the bases to fit the projector lights beside the main bulb units.
Impatient creations assisted with the finishing of the
light units, final mounting of the bulbs and painting the silver
reflective coating. I molded several new sets of lenses from both
poly carbonate and Lexan. Several hours were spent fitting the
lenses to the opening formed by the Border hood and the new Phoenix front
bumper. I used a belt sander to carefully sand away the edges until
a near perfect fit is made. Once the lenses fit the opening, four
mounting screw holes are drilled through the lenses and into the light
bases. I carefully counter sink each hole in the lenses and use
counter sunk wood screws to mount the them.
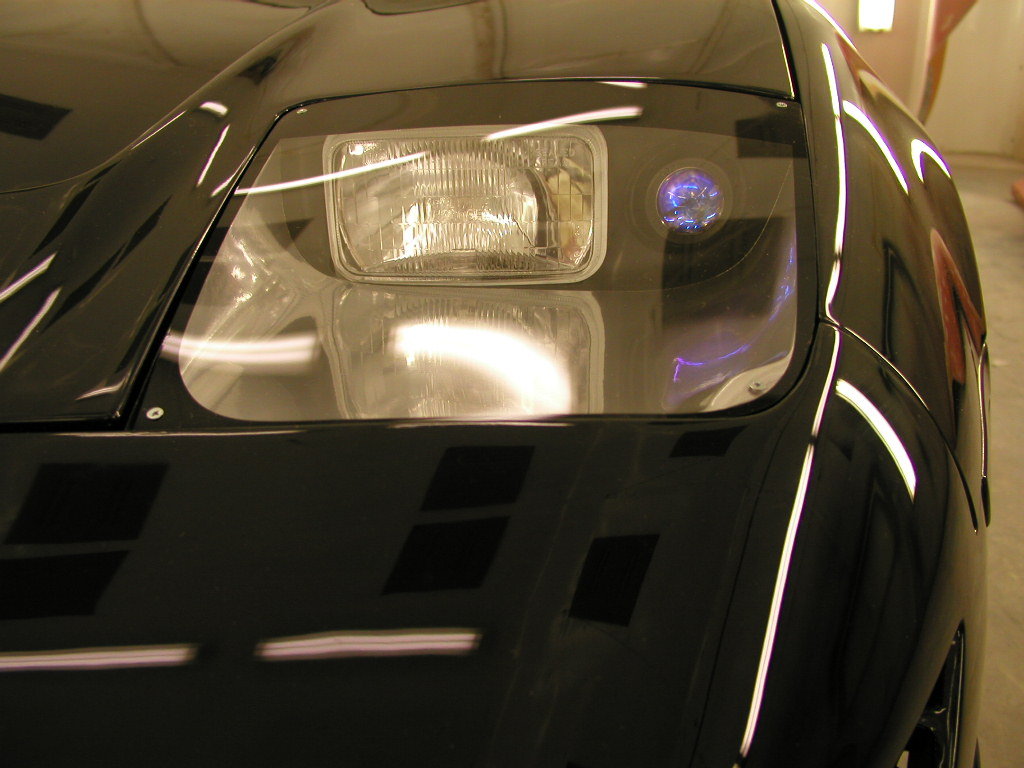
The lenses are now ready for painting the black borders. I use a
high quality semi-gloss paint (spray can) on the inside of the lens.
The border is taped off using 1/4 inch blue painters tape, followed by
masking tape and paper to cover the remainder of the inside. Several
light coats are needed.
Wiring work requires that you have the Toyota factory electrical manual. You have to understand how Toyota uses the bright/Dim switch to switch the ground from the bright side connection to the Dim side connection. When you have the wires identified, you can experiment with a test light to be sure it works. I use a 1 watt wire wound resistor from Radio Shack to reduce the voltage on the Dim side. This is a temporary solution until I have the dim lights installed in the front of the clear corner positions. I plan to use an even smaller sealed beam found on late model Camaro for the dim lights.
Photos of the newest light design
The Beast Web ///|||\\\ Copyright ©
2000 Jim Griffin. All rights reserved.
E-mail: Ace123Jim@aol.com Web site:
http://www.MR2Beast.com
Last revised October 22, 2002.